Hexo 备忘 我的配置
Hexo 版本 : hexo-cli: 4.3.2, hexo: 7.3.0(当前最新)Node.js 版本 : 22.16.0Git 版本 : 2.47.0.sindows.2PNPM 版本 : 10.12.4Windows 版本 : 11
安装 Node.js
在 官网 安装 LTS 版本,电脑一般来说内存足够直接在 C 盘即可,当然,换路径也可以,我反正正常下载换路径,没什么问题。
安装完成后,检查是否安装成功。在键盘按下 <kbd> win </kbd> + <kbd> R </kbd> 键,输入 CMD,然后回车,打开 CMD 窗口,执行 node -v 命令,看到版本信息,则说明安装成功。
安装 Git 在 官网 安装最新版本的 64-bit Git for Windows Setup 安装包。
安装完成后,在命令行输入 git --version,如果显示版本号,则说明安装成功。
常用命令 1 2 3 git config -l //查看所有配置 git config --system --list //查看系统配置 git config --global --list //查看用户(全局)配置
配置 Git 用户名和邮箱 1 2 git config --global user.name "你的用户名" git config --global user.email "你的邮箱"
安装 包管理器 安装 npm 为一切的基石,一般来说,你安装了 node,也相当于你安装了 npm,通过一下命令来验证:
修改 npm 源 。npm 下载各种模块,默认是从国外服务器下载,速度较慢,建议配置成淘宝镜像。打开 CMD 窗口,运行如下命令:
1 npm config set registry https://registry.npm.taobao.org
安装 pnpm pnpm 是一个快速、节省磁盘空间的包管理器,类似于 npm 和 yarn。安装 pnpm 可以通过以下命令:
为什么选择 pnpm?因为它的安装速度快,依赖管理更高效,且相对于 npm,我使用 npm 容易失败且慢,pnpm 给我的体验更好。
安装 Hexo
在 Git BASH 输入如下命令安装 Hexo:
1 pnpm install -g hexo-cli
安装完后输入 hexo -v 验证是否安装成功。
<a id="github-config"></a>Github配置
上述操作是前提,接下来是配置 Github。
注册 github 就不说了,很基础的东西,连我个代码小白都懂就不多说了。
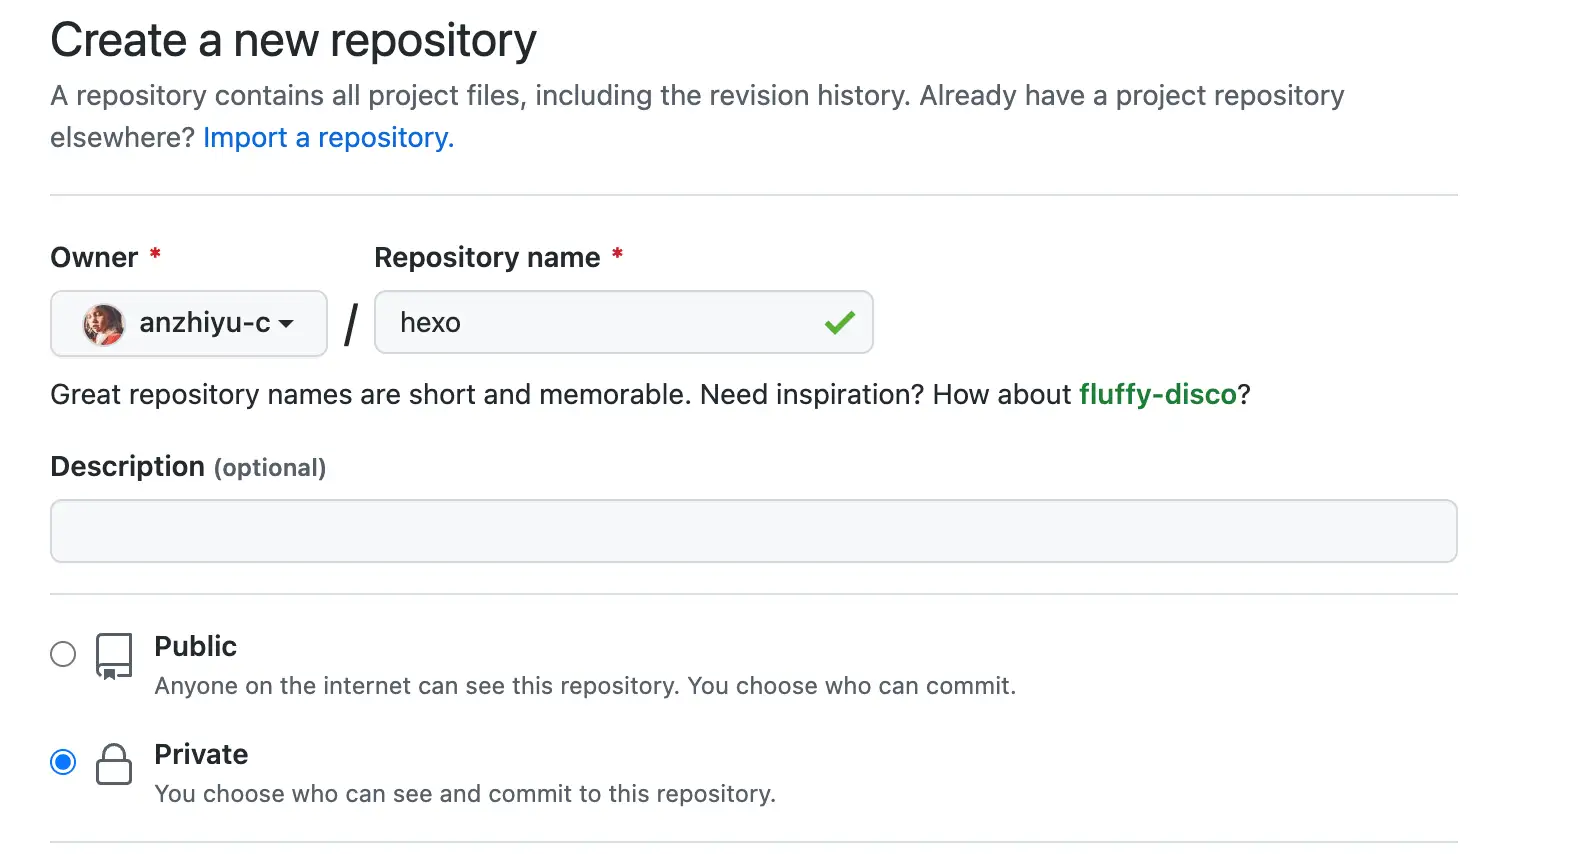
创建仓库
登录 GitHub,点击右上角的 + 号,选择 New repository。
填写仓库名称,建议使用 <username>.github.io 格式(例如:yourusername.github.io),这样可以直接作为个人主页。
这里我不准备直接使用常规的 hexo deploy 命令来部署到 GitHub Pages,因为当你的文章一多,生成时间就会繁琐,这里的建议是使用 Github Actions 来自动部署。
这一部分的教程是源于 店长的文章 ,但是有点老旧了,于是我做了点更改(这里的图片来源于 安知鱼 ):
首先要创建一个放置源码的私有仓库,以下称之为 hexo-source,
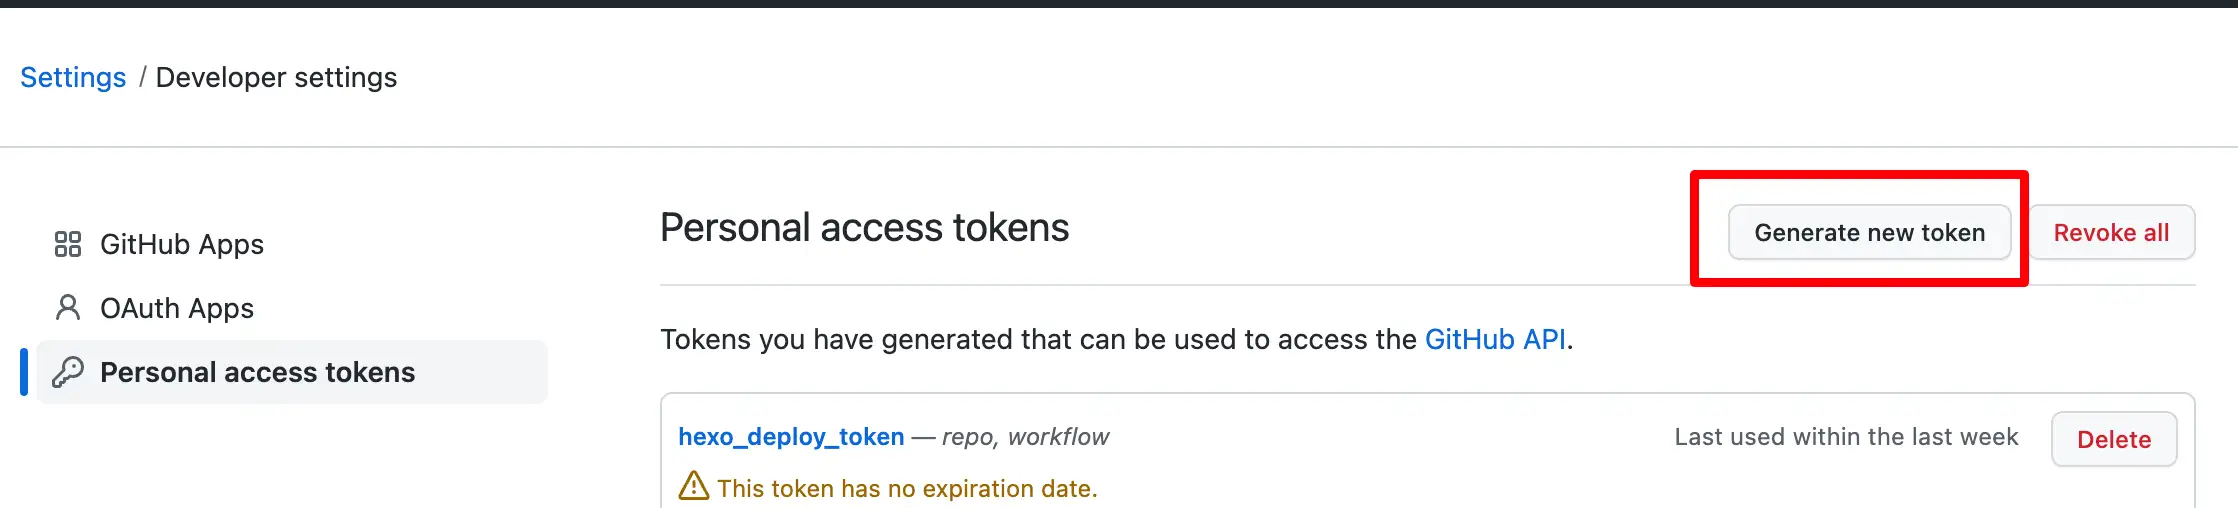
然后要生成一个 Github 密钥:
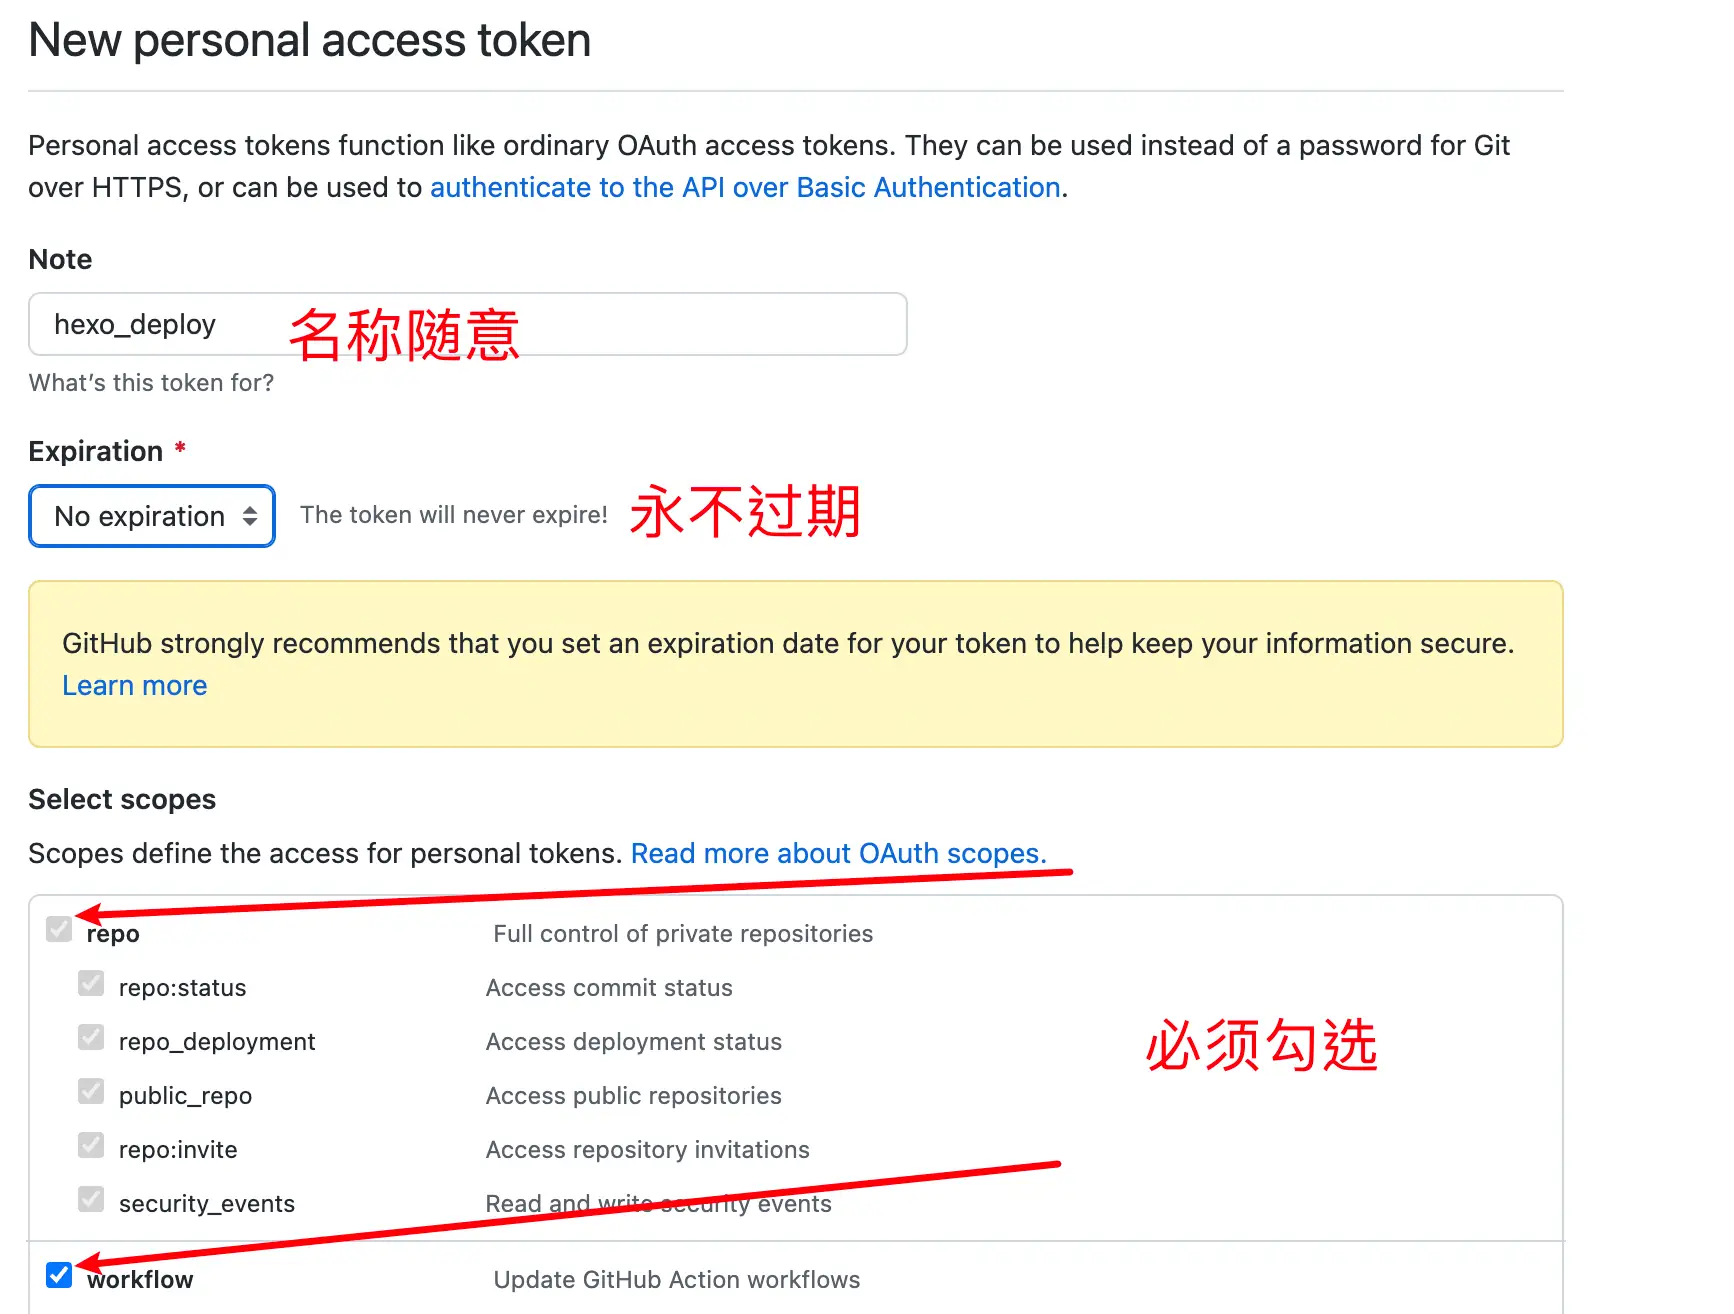
访问 Github-> 头像(右上角)-> Settings-> Developer Settings-> Personal access tokens-> generate new token, 创建的 Token 名称随意,但必须勾选 repo 项 和 workflows 项。
点击 链接 前往生成
[!NOTE]
!!! token 只会显示这一次,之后将无法查看,所以务必保证你已经记录下了 Token。之后如果忘记了就只能重新生成重新配置了。
在 hexo-source 仓库中的设置里点击设置 -> action -> General -> 工作流程权限
勾选 Read and write permissions,并且勾选 Allow <span style="background:#FF0000;"></span>all actions and reusable workflows。
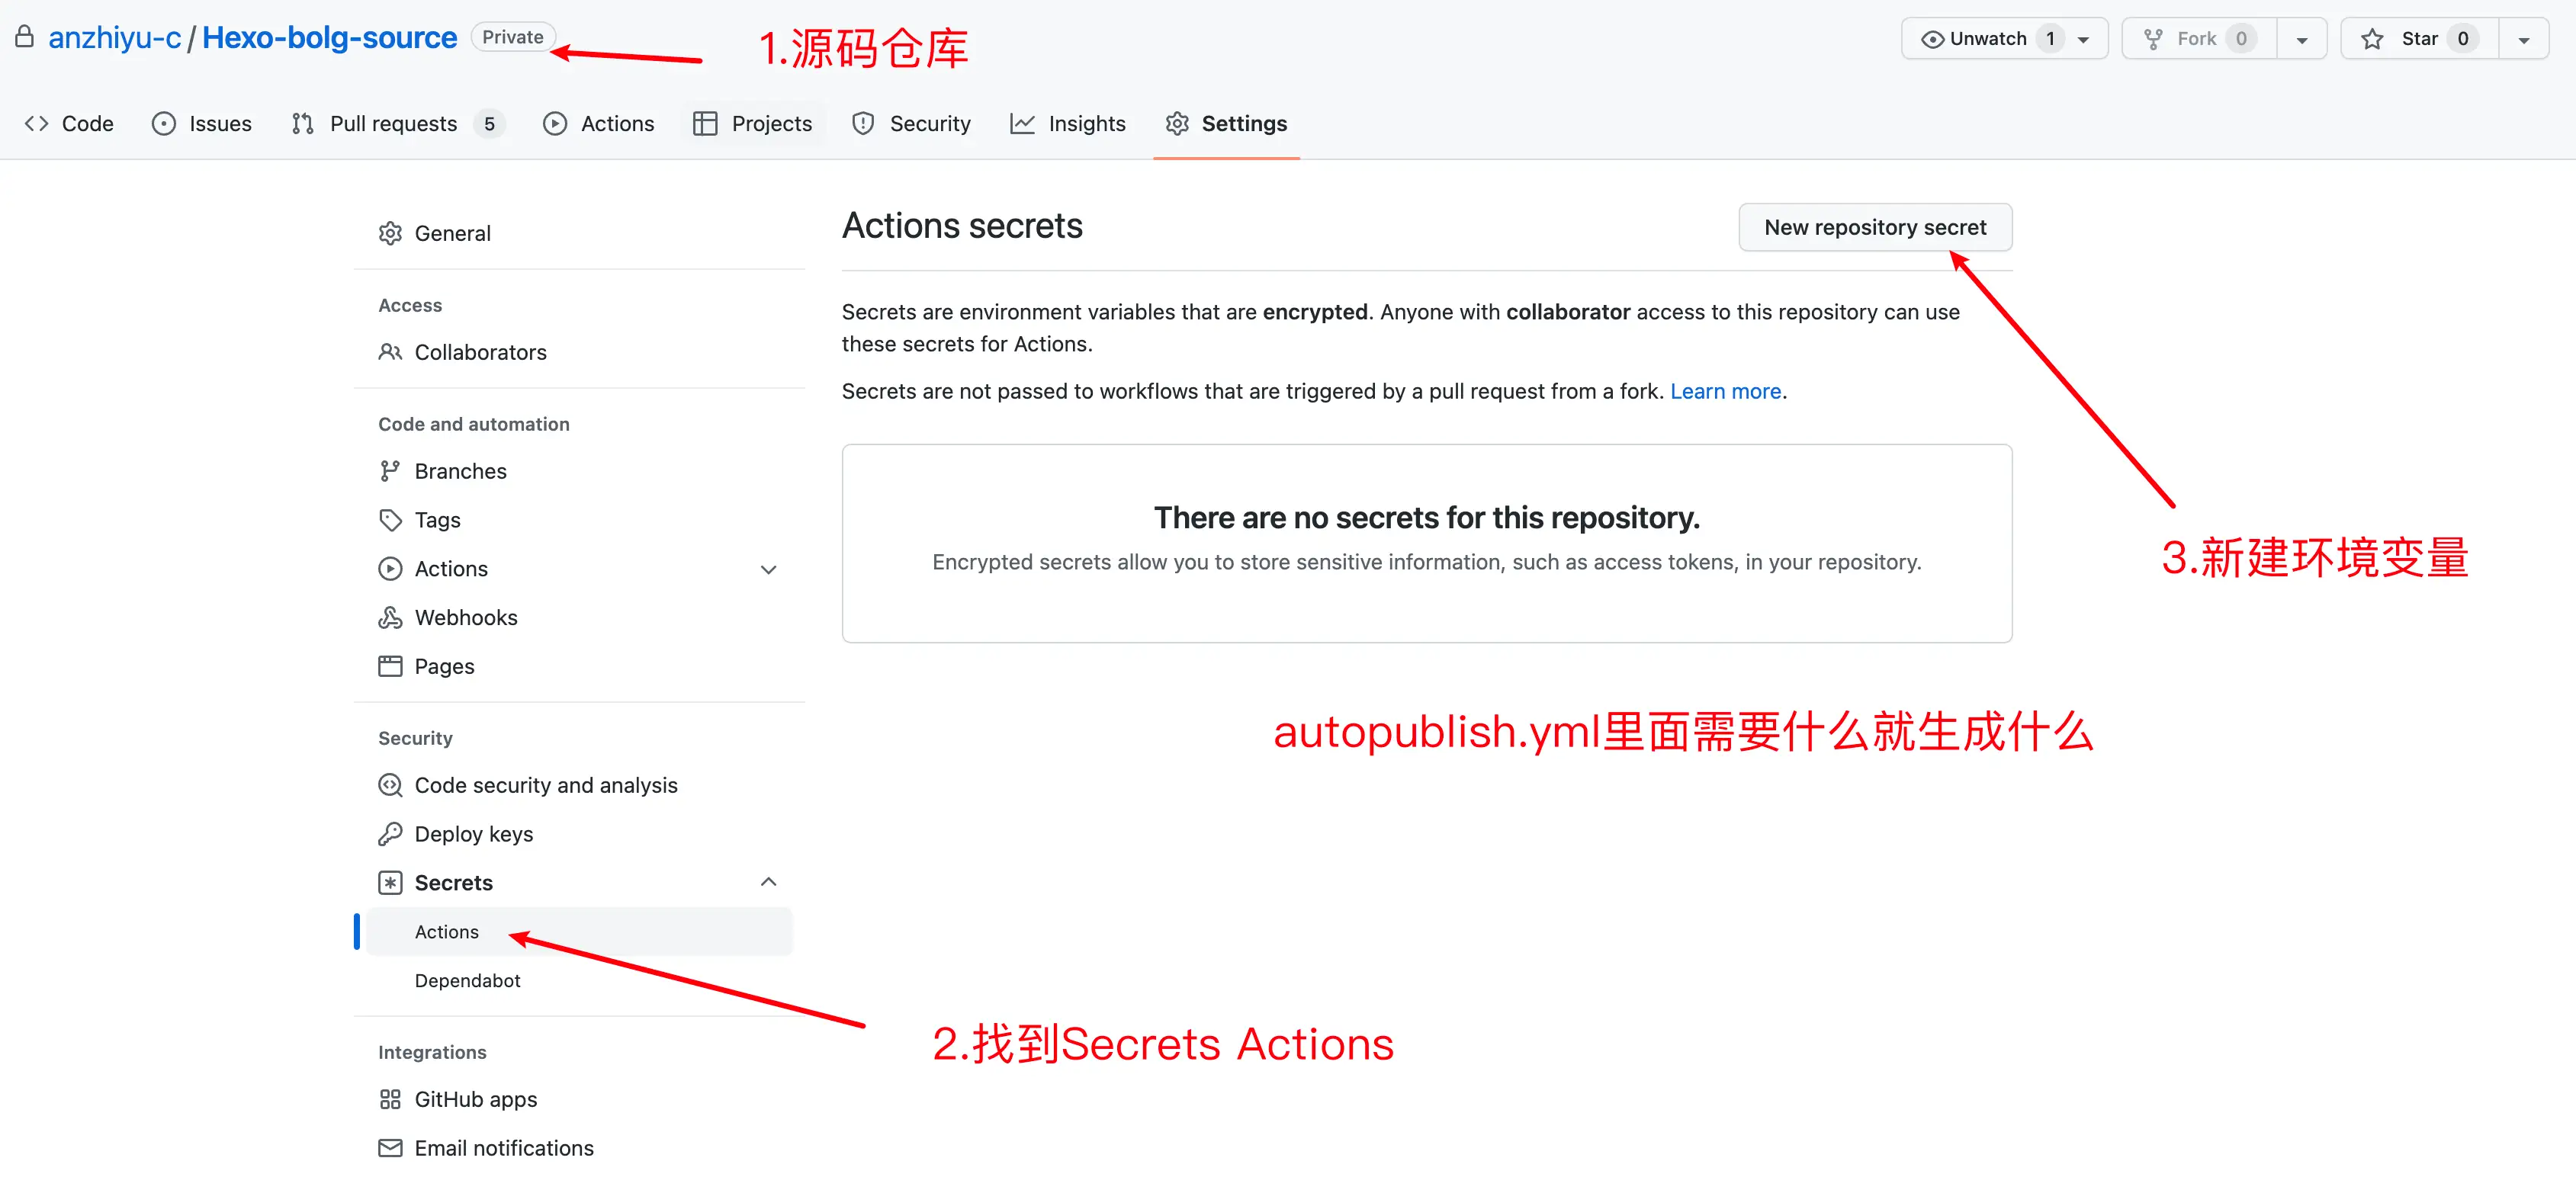
在设置里 -> Secrets and variables -> Actions -> New repository secret 添加
GITHUBTOKEN:放置你刚才生成的 Token。
上述是前置条件,接下来要先部署 hexo,你才好继续下一步。 初始化 Hexo
在本地新建一个文件夹,例如 hexo-solitude。
这里我是用的是 vscode 打开该文件夹,然后在终端输入以下命令来初始化 Hexo:
我一般都不填,直接在文件下下就可以开始,如果你添加了项目名称,那么下一步就是:
安装依赖包:
然后就是选择你想要的主题,这里我使用的是Solitude ,具体的配置不细讲,我只讲一部分:
首先就是基本的安装,这里还是选择 git clone没有别的原因,主要还是会改点源码,不想改的直接pnpm下载即可:
1 2 3 4 5 // git安装 git clone -b dev https://github.com/everfu/hexo-theme-solitude.git themes/solitude // pnpm 安装 pnpm i hexo-theme-solitude
然后在 _config.yml里修改成:
配置 下列代码是我的备忘:
1 2 3 4 5 6 7 8 9 10 11 12 13 14 15 16 17 18 19 20 21 22 23 24 25 26 27 28 29 30 31 32 33 34 35 36 37 38 39 40 41 42 43 44 45 46 47 48 49 50 51 52 53 54 55 56 57 58 59 60 61 62 63 64 65 66 67 68 69 70 71 72 73 74 75 76 77 78 79 80 81 82 83 84 85 86 87 88 89 90 91 92 93 94 95 96 97 98 99 100 101 102 103 104 105 106 107 108 109 110 111 112 113 114 115 116 117 118 119 120 121 122 123 124 125 126 127 128 129 130 131 132 133 134 135 136 137 138 139 140 141 142 143 144 145 146 147 148 149 150 151 152 153 154 155 156 157 158 159 160 161 162 163 164 165 166 167 168 169 170 171 172 173 174 175 176 177 178 179 180 181 182 183 184 185 186 187 188 189 190 191 192 193 194 195 196 197 198 199 200 201 202 203 204 205 206 207 208 209 210 211 212 213 214 215 216 217 218 219 220 221 222 223 224 225 226 227 228 229 230 231 232 233 234 235 236 237 238 239 240 241 242 243 244 245 246 247 248 title: 喵落阁 subtitle: '克喵的博客' description: '愿你看清一切真相后,依旧热爱你的家人和朋友。' keywords: 克喵,kemiao,博客 author: 克喵爱吃卤面 language: zh-CN timezone: 'Asia/Shanghai' url: permalink: posts/:abbrlink.html permalink_defaults: pretty_urls: trailing_index: true trailing_html: true source_dir: source public_dir: public tag_dir: tags archive_dir: archives category_dir: categories code_dir: downloads/code i18n_dir: :lang skip_render: new_post_name: :title.md default_layout: post titlecase: false external_link: enable: true field: site exclude: '' filename_case: 0 render_drafts: false post_asset_folder: false relative_link: false future: true syntax_highlighter: highlight.js highlight: line_number: false auto_detect: false tab_replace: '' wrap: true hljs: false prismjs: preprocess: true line_number: true tab_replace: '' index_generator: path: '' per_page: 10 order_by: -date default_category: uncategorized category_map: tag_map: meta_generator: true date_format: YYYY-MM-DD time_format: HH:mm:ss updated_option: 'mtime' per_page: 10 pagination_dir: page include: []exclude: []ignore: []theme: solitude deploy: type: git repo: git@github.com-xx:kemiaofxjun/kemiaofxjun.github.io.git branch: main feed: type: atom path: atom.xml limit: 20 hub: content: true content_limit: 140 content_limit_delim: ' ' order_by: -date autodiscovery: true markdown: preset: 'default' render: html: true xhtmlOut: false langPrefix: 'language-' breaks: true linkify: true typographer: true quotes: '“”‘’' enable_rules: disable_rules: plugins: anchors: level: 2 collisionSuffix: '' permalink: true permalinkClass: 'headerlink' permalinkSide: 'left' permalinkSymbol: '' case: 0 separator: '-' images: lazyload: true prepend_root: false post_asset: false inline: false swpp: enable: true auto_exec: true gen_dom: true abbrlink: alg: crc16 rep: hex sitemap: path: sitemap.xml rel: false tags: true categories: true algolia: appId: "" apiKey: "" adminApiKey: "" chunkSize: 5000 indexName: "index-name" fields: - content:strip:truncate,0,500 - excerpt:strip - gallery - permalink - photos - slug - tags - title hexo_safego: general: enable: true enable_base64_encode: true enable_target_blank: true security: url_param_name: 'u' html_file_name: 'go.html' ignore_attrs: - 'data-fancybox' scope: apply_containers: - '#article-container' apply_pages: - "/posts/" - "/devices/" exclude_pages: whitelist: domain_whitelist: - "kemeow.top" - "kemiaosw.top" - "050815.xyz" - "314926.xyz" - "051531.xyz" appearance: avatar: https://img.314926.xyz/images/2025/08/13/no-background-kemiaofxjun.webp title: "喵洛阁" subtitle: "安全中心" darkmode: auto countdowntime: 4 debug: enable: false bangumi: enable: true source: bili path: vmid: 3546643173477234 title: "追番列表" quote: "生命不息,追番不止!" show: 1 lazyload: false loading: showMyComment: true pagination: false extra_options: top_img: false lazyload: enable: false
博客的其他修改基本就是来自教程和一些博主的网站。
插件
基础依赖 hexo-renderer-pug
1 pnpm i hexo-renderer-pug
字数统计 hexo-wordcount
配置里修改:
数学公式 卸载 hexo-render-marked
1 npm un hexo-renderer-marked
安装 hexo-renderer-markdown-it katex @renbaoshuo/markdown-it-katex
1 pnpm i hexo-renderer-markdown-it katex @renbaoshuo/markdown-it-katex
配置里修改
1 2 3 4 5 6 7 8 9 10 11 12 13 katex: enable: false per_page: false copytex: false
添加以下内容到 _config.yml
1 2 3 4 5 6 7 8 9 10 11 12 13 14 15 16 17 18 19 20 21 22 23 24 25 26 27 28 markdown: preset: 'default' render: html: true xhtmlOut: false langPrefix: 'language-' breaks: true linkify: true typographer: true quotes: '“”‘’' enable_rules: disable_rules: plugins: - '@renbaoshuo/markdown-it-katex' anchors: level: 2 collisionSuffix: '' permalink: false permalinkClass: 'header-anchor' permalinkSide: 'left' permalinkSymbol: '¶' case: 0 separator: '-' images: lazyload: false prepend_root: false post_asset: false inline: false
开启配置项
1 2 3 4 5 6 7 8 9 10 11 12 13 14 katex: enable: true per_page: true copytex: false
PWA 安装 hexo-swpp 和 swpp-backends 插件
在博客根目录执行
1 2 3 pnpm i hexo-swpp pnpm i swpp-backends
开启配置
1 2 3 4 5 6 7 8 9 10 11 12 13 14 15 pwa: enable: true manifest: /manifest.json theme_color: "#006a73" mask_icon: /img/pwa/favicon.png apple_touch_icon: /img/pwa/favicon.png bookmark_icon: /img/pwa/favicon.png favicon_32_32: /img/pwa/favicon_32.png favicon_16_16: /img/pwa/favicon_16.png
在 _config.yml里添加swpp配置
1 2 3 4 5 6 swpp: enable: true auto_exec: true gen_dom: true
在 source 目录中创建 manifest.json 文件
1 2 3 4 5 6 7 8 9 10 11 12 13 14 15 16 17 18 19 20 21 22 23 24 25 26 27 28 29 30 31 32 33 34 35 36 37 38 39 40 41 42 43 44 45 46 47 48 49 50 { "name" : "网站名称" , "short_name" : "网站名称缩写" , "theme_color" : "#006a73" , "background_color" : "#006a73" , "display" : "fullscreen" , "scope" : "/" , "start_url" : "/" , "id" : "/" , "icons" : [ { "src" : "/img/pwa/favicon_16.png" , "sizes" : "16x16" , "type" : "image/png" , "purpose" : "any" } , { "src" : "/img/pwa/favicon_16.png" , "sizes" : "16x16" , "type" : "image/png" , "purpose" : "maskable" } , { "src" : "/img/pwa/favicon_32.png" , "sizes" : "32x32" , "type" : "image/png" , "purpose" : "any" } , { "src" : "/img/pwa/favicon_32.png" , "sizes" : "32x32" , "type" : "image/png" , "purpose" : "maskable" } , { "src" : "/img/pwa/favicon.png" , "sizes" : "180x180" , "type" : "image/png" , "purpose" : "any" } , { "src" : "/img/pwa/favicon.png" , "sizes" : "180x180" , "type" : "image/png" , "purpose" : "maskable" } ] , "splash_pages" : null }
在博客根目录创建一个 sw-rules.js 文件
1 2 3 4 5 6 7 8 9 10 11 12 13 14 15 16 17 18 19 20 21 22 23 24 25 26 27 28 29 30 31 32 33 34 35 36 37 38 39 40 41 42 43 44 45 46 47 48 49 50 51 52 53 54 55 56 57 58 59 60 61 62 63 64 65 66 67 68 69 70 71 72 73 74 75 76 77 78 79 80 81 82 83 84 85 86 87 88 89 90 91 92 93 94 95 96 97 98 99 100 101 102 103 104 105 106 107 108 109 110 111 112 113 114 115 116 117 118 119 120 121 122 123 124 125 126 127 128 129 130 131 132 133 134 135 136 137 138 139 140 141 142 module .exports .config = { serviceWorker : { escape : 1 , cacheName : 'SolitudeCache' , debug : false , }, register : { onsuccess : undefined , onerror : () => console .error ( 'Service Worker 注册失败!可能是由于您的浏览器不支持该功能!' ), builder : (root, framework, pluginConfig ) => { const { onerror, onsuccess } = pluginConfig.register ; return ` <script> (() => { const sw = navigator.serviceWorker; const error = ${onerror && onerror.toString()} ; if (!sw?.register('${new URL(root).pathname} sw.js') ${onsuccess ? `?.then(${onsuccess.toString()} )` : "" } ?.catch(error) ) error() })() </script>` ; }, }, dom : { onsuccess : () => { caches .match ('https://id.v3/' ) .then ((res ) => { if (res) res.json ().then ((json ) => { utils && utils.snackbarShow ( `已刷新缓存,更新为${json.escape + '.' + json.global + '.' + json.local } 版本最新内容` false , 2500 ); }); else console .info ('未找到缓存' ); }) .catch ((error ) => console .error ('缓存匹配出错' , error)); }, }, json : { maxHtml : 15 , charLimit : 1024 , merge : [], exclude : { localhost : [], other : [], }, }, external : { timeout : 5000 , concurrencyLimit : 100 , js : [], stable : [ /^https:\/\/npm\.elemecdn\.com\/[^/@]+\@[^/@]+\/[^/]+\/[^/]+$/ , /^https:\/\/cdn\.cbd\.int\/[^/@]+\@[^/@]+\/[^/]+\/[^/]+$/ , /^https:\/\/cdn\.jsdelivr\.net\/npm\/[^/@]+\@[^/@]+\/[^/]+\/[^/]+$/ , ], replacer : (srcUrl ) => { if (srcUrl.startsWith ('https://cdn.jsdelivr.net/npm/' )) { const pathname = new URL (srcUrl).pathname ; return [ srcUrl, `https://cdn.cbd.int/${pathname} ` , `https://npm.elemecdn.com/${pathname} ` , `https://fastly.jsdelivr.net/npm/${pathname} ` , ]; } else { return srcUrl; } }, }, }; module .exports .cacheRules = { simple : { clean : true , search : false , match : (url, $eject ) => url.host === $eject.domain && ['/404.html' ].includes (url.pathname ), }, cdn : { clean : true , match : (url ) => [ 'cdn.cbd.int' , 'lf26-cdn-tos.bytecdntp.com' , 'lf6-cdn-tos.bytecdntp.com' , 'lf3-cdn-tos.bytecdntp.com' , 'lf9-cdn-tos.bytecdntp.com' , 'cdn.staticfile.org' , 'npm.elemecdn.com' , ].includes (url.host ) && url.pathname .match (/\.(js|css|woff2|woff|ttf|cur)$/ ), }, }; module .exports .getSpareUrls = (srcUrl ) => { if (srcUrl.startsWith ('https://npm.elemecdn.com' )) { return { timeout : 3000 , list : [ srcUrl, `https://fastly.jsdelivr.net/${new URL(srcUrl).pathname} ` , ], }; } }; module .exports .ejectValues = (hexo, rules ) => { return { domain : { prefix : 'const' , value : new URL (hexo.config .url ).host , }, }; }; module .exports .skipRequest = (request ) => request.url .startsWith ("https://i0.hdslb.com" ) || request.url .startsWith ('https://meting.qjqq.cn' ) || request.url .startsWith ('https://api.i-meto.com' );
hexo-deploy-git
1 pnpm i hexo-deploy-git --save
hexo-generator-feed
1 pnpm i hexo-generator-feed --save
hexo 的短链接 hexo-abbrlink
1 pnpm i hexo-abbrlink --save
在 _config.yml里修改:
1 2 3 permalink: posts/:abbrlink/ permalink: posts/:abbrlink.html
添加:
1 2 3 4 5 6 7 abbrlink: alg: crc32 rep: hex drafts: false force: false writeback: true
博客的sitemap hexo-generator-sitemap
1 pnpm i hexo-generator-sitemap --save
在 _config.yml里添加配置:
1 2 3 4 5 6 7 8 9 sitemap: path: - sitemap.xml - sitemap.txt template: ./sitemap_template.xml template_txt: ./sitemap_template.txt rel: false tags: true categories: true
使用algolia搜索 hexo-algoliasearch
注册地址:dashboard.algolia.com/users/sign_up
注册成功后创建应用:dashboard.algolia.com/account/plan/create?from=dashboard
search -> configure -> index添加index_name即可
在博客执行命令:
1 pnpm i hexo-algoliasearch --save
_config.yml里添加
1 2 3 4 5 6 7 8 9 10 11 12 13 14 15 algolia: appId: "Z7A3XW4R2I" apiKey: "12db1ad54372045549ef465881c17e743" adminApiKey: "40321c7c207e7f73b63a19aa24c4761b" chunkSize: 5000 indexName: "my-hexo-blog" fields: - content:strip:truncate,0,500 - excerpt:strip - gallery - permalink - photos - slug - tags - title
[!NOTE]
!!!配置完成后记得运行 hexo clean
在 hexo g 后实行下列代码:
**hexo-safego **安全跳转插件
使用该插件之前,需要先安装 cheerio,cheerio 是一个轻量级的库,用于在服务器端快速、灵活地实现 jQuery 核心功能。在 hexo-safego 插件中,cheerio 被用来解析和操作生成的静态 HTML 内容,类似于在浏览器中使用 jQuery 处理 DOM 元素。这使得插件能够在生成静态页面时,处理和替换外部链接,增强博客的安全性,而不需要在客户端引入 jQuery。Hexo 一般都有这个插件,可以在 node_modules 查看,如果没有,请先执行:
然后即可安装该插件:
1 pnpm i hexo-safego --save
在 hexo根目录的 _config.yml文件中添加以下配置:
1 2 3 4 5 6 7 8 9 10 11 12 13 14 15 16 17 18 19 20 21 22 23 24 25 26 27 28 29 30 31 32 33 34 35 36 37 hexo_safego: general: enable: true enable_base64_encode: true enable_target_blank: true security: url_param_name: 'u' html_file_name: 'go.html' ignore_attrs: - 'data-fancybox' scope: apply_containers: - '#article-container' apply_pages: - "/posts/" - "/devices/" exclude_pages: whitelist: domain_whitelist: - "qyliu.top" - "liushen.fun" appearance: avatar: /info/avatar.ico title: "清羽飞扬" subtitle: "安全中心" darkmode: true countdowntime: -1 debug: enable: false
hexo的追番页面 :hexo-bilibili-bangumi
1 pnpm i hexo-bilibili-bangumi --save
在 _config.yml配置:
1 2 3 4 5 6 7 8 9 10 11 12 13 14 15 16 17 18 19 20 21 22 bangumi: enable: true source: bili path: bangumis/index.html vmid: title: '追番列表' quote: '生命不息,追番不止!' show: 1 lazyload: true metaColor: color: webp: true progress: true cinema: enable: true source: bili game: enable: true source: bgmv0
还在更新中。。。
Github action配置 承接段落 的继续吧,未来会在出水一期。
接下来就是创建一个私有仓库,根据大佬的文章,是为了保护Token ,见仁见智。
这个私有仓库的建立是存储Hexo博客代码,如果你要使用Qexo
,这也是必不可少的!
创建完成后,需要把博客的源码 push 到这里。首先获取远程仓库地址,此处虽然 SSH 和 HTTPS 均可。SSH 在绑定过 ssh key 的设备上无需再输入密码,HTTPS 则需要输入密码,但是 SSH 偶尔会遇到端口占用的情况。请自主选择。
[!TIP]
这里之所以是私有仓库,是因为在接下来的配置中会用到 Token,如果 Token 被盗用,别人可以肆意操作你的 github 仓库内容,为了避免这一风险,才选择的博客源码闭源。
配置 Github Action
在 [Blogroot]新建 .github文件夹,注意开头是有个 .的。然后在 .github 内新建 workflows 文件夹,再在 workflows 文件夹内新建 autodeploy.yml,在 [Blogroot]/.github/workflows/autodeploy.yml 里面输入
1 2 3 4 5 6 7 8 9 10 11 12 13 14 15 16 17 18 19 20 21 22 23 24 25 26 27 28 29 30 31 32 33 34 35 36 37 38 39 40 41 42 43 44 45 46 47 48 49 50 51 52 53 54 55 56 57 58 59 60 61 62 63 name: 自动部署 on: push: branches: - main release: types: - published jobs: deploy: runs-on: ubuntu-latest steps: - name: 检查分支 uses: actions/checkout@v4 with: ref: main - name: 安装 Node uses: actions/setup-node@v4 with: node-version: "22.x" - name: 安装 Hexo run: | export TZ='Asia/Shanghai' npm install hexo-cli -g npm install yamljs --save - name: 缓存 Hexo uses: actions/cache@v4 id: cache with: path: node_modules key: ${{ runner.os }}-node-${{ hashFiles('**/package-lock.json') }} - name: 安装依赖 if: steps.cache.outputs.cache-hit != 'true' run: | npm install --save npm install hexo-algoliasearch --save npm install hexo-bilibili-bangumi --save - name: 生成静态文件 run: | node ./link.js hexo clean hexo generate hexo bangumi -u hexo algolia - name: 部署 run: | cd ./public git init -b main git config --global user.name '${{ secrets.GITHUBUSERNAME }}' git config --global user.email '${{ secrets.GITHUBEMAIL }}' git add . git commit -m "${{ github.event.head_commit.message }} $(date +"%Z %Y-%m-%d %A %H:%M:%S") Updated by GitHub Actions" git push --force --quiet "https://${{ secrets.GITHUBUSERNAME }}:${{ secrets.GITHUBTOKEN }}@github.com/${{ secrets.GITHUBUSERNAME }}/${{ secrets.GITHUBUSERNAME }}.github.io.git" main
上述代码是来自店长 的修改自用,为什么不用安知鱼 的?
首先把Token直接放在仓库的文件里还是不太好。
像我这种在本地搞的,推不到仓库里,因为这里的token不能直接上传,所以改成环境变量来引入,但是依旧有各种问题,相反使用了店长的代码后,就大差不差,询问AI后就得到目前的代码,也就可以正式上传了。(无拉踩的意思)
之后需要自己到仓库的 Settings->Secrets->actions 下添加环境变量,变量名参考脚本中出现的,依次添加。
重新设置远程仓库和分支
🍼第一次使用git管理博客源码
删除或者先把 [Blogroot]/themes/solitude/.git移动到非博客文件夹目录下,原因是主题文件夹下的 .git文件夹的存在会导致其被识别成子项目,从而无法被上传到源码仓库。
在博客根目录 [Blogroot]路径下运行指令:
1 2 3 4 5 git init git remote add origin git@github.com:[GithubUsername]/[SourceRepo].git git checkout -b master
添加屏蔽项
1 2 3 4 5 6 7 8 9 10 .DS_Store Thumbs.db db.json *.log node_modules/ public/ .deploy*/ .deploy_git*/ .idea themes/solitude/.git
如果不是 solitude主题,记得替换最后一行内容为你自己当前使用的主题。
1 2 3 4 git add . git commit -m "github action update" git push origin master
此时你的主题文件夹若已经被正常上传,并且你也添加了主题文件夹下的.git 文件夹的屏蔽项。那你可以考虑把第二步移走或删除的 .git放回来,用作以后升级。(不禁怀疑真的有人会去用这个方式来升级吗)
🍾曾经做过git管理源码的操作
添加屏蔽项
因为能够使用指令进行安装的内容不包括在需要提交的源码内,所有我们需要将这些内容添加到屏蔽项,表示不上传到 github 上。这样可以显著减少需要提交的文件量和加快提交速度。[Blogroot]/.gitignore,输入以下内容:
1 2 3 4 5 6 7 8 9 10 .DS_Store Thumbs.db db.json *.log node_modules/ public/ .deploy*/ .deploy_git*/ .idea themes/solitude/.git
如果不是 solitude主题,记得替换最后一行内容为你自己当前使用的主题。
提交源码到私有仓库 [SourceRepo][Blogroot]下启动终端,使用 git 指令重设仓库地址。这样在新建仓库,我们仍旧可以保留珍贵的 commit history,便于版本回滚。
1 2 3 4 5 6 7 8 9 git remote rm origin git remote add origin git@github.com:[GithubUsername]/[SourceRepo].git git checkout -b master git add . git commit -m "github action update" git push origin master
可能遇到的 bug
[!IMPORTANT]
要是还不行,那就删了 solitude 主题文件夹下的.git 文件夹,然后再重复上述的 commit 操作。
挖坑 大致写到这,未来或许会有下一章挖坑?但是目前通用的就到这,然后后续会写Qexo的简单使用方法、solitude的一些配置更改和我踩坑经历吧。